
 Healthcare App Development Services
 Real Estate Web Development Services
 E-Commerce App Development Services
 E-Commerce Web Development Services
 Blockchain E-commerce Development Company
 Fintech App Development Services
 Fintech Web Development
 Blockchain Fintech Development Company
 E-Learning App Development Services
 Restaurant App Development Company
 Mobile Game Development Company
 Travel App Development Company
 Automotive Web Design
 AI Traffic Management System
 AI Inventory Management Software
 AI Development Company
  ChatGPT integration services
  AI Integration Services
  Generative AI Development Services
  Natural Language Processing Company
 Machine Learning Development
  Machine learning consulting services
  Blockchain Development
  Blockchain Software Development
  Smart Contract Development Company
  NFT Marketplace Development Services
  Asset Tokenization Company
 DeFi Wallet Development Company
 Mobile App Development
  IOS App Development
  Android App Development
  Cross-Platform App Development
  Augmented Reality (AR) App Development
  Virtual Reality (VR) App Development
  Web App Development
  SaaS App Development
 Flutter
  React Native
  Swift (IOS)
  Kotlin (Android)
  Mean Stack Development
  AngularJS Development
  MongoDB Development
  Nodejs Development
  Database Development
 Ruby on Rails Development
 Expressjs Development
  Full Stack Development
  Web Development Services
  Laravel Development
  LAMP Development
  Custom PHP Development
  .Net Development
  User Experience Design Services
  User Interface Design Services
  Automated Testing
  Manual Testing
  Digital Marketing Services
 Ride-Sharing And Taxi Services
 Food Delivery Services
 Grocery Delivery Services
 Transportation And Logistics
 Car Wash App
 Home Services App
 ERP Development Services
 CMS Development Services
 LMS Development
 CRM Development
 DevOps Development Services
 AI Business Solutions
 AI Cloud Solutions
 AI Chatbot Development
 API Development
 Blockchain Product Development
 Cryptocurrency Wallet Development
 About Talentelgia
  Our Team
  Our Culture
 Healthcare App Development Services
 Real Estate Web Development Services
 E-Commerce App Development Services
 E-Commerce Web Development Services
 Blockchain E-commerce
Development Company
Blockchain E-commerce
Development Company Fintech App Development Services
 Finance Web Development
 Blockchain Fintech
Development Company
Blockchain Fintech
Development Company E-Learning App Development Services
 Restaurant App Development Company
 Mobile Game Development Company
 Travel App Development Company
 Automotive Web Design
 AI Traffic Management System
 AI Inventory Management Software
 AI Development Company
 ChatGPT integration services
 AI Integration Services
 Machine Learning Development
 Machine learning consulting services
 Blockchain Development
 Blockchain Software Development
 Smart contract development company
 NFT marketplace development services
 IOS App Development
 Android App Development
 Cross-Platform App Development
 Augmented Reality (AR) App
Development
Augmented Reality (AR) App
Development Virtual Reality (VR) App Development
 Web App Development
 Flutter
 React
Native
React
Native Swift
(IOS)
Swift
(IOS) Kotlin (Android)
 MEAN Stack Development
 AngularJS Development
 MongoDB Development
 Nodejs Development
 Database development services
 Ruby on Rails Development services
 Expressjs Development
 Full Stack Development
 Web Development Services
 Laravel Development
 LAMP
Development
LAMP
Development Custom PHP Development
 User Experience Design Services
 User Interface Design Services
 Automated Testing
 Manual
Testing
Manual
Testing About Talentelgia
 Our Team
 Our Culture
With today’s quick pace in the digital age, finding precise and pertinent information fast is the key. Whether you are creating an AI chatbot, reviewing business metrics, or enhancing search experiences in an application, the capacity to obtain exact information speedily can prove to be a make-or-break point. That’s where DeepSeek API takes the lead.
DeepSeek API is a high-powered tool built to improve searching ability, enabling applications to find and understand data smartly. Consider it to be a superior search engine beyond basic keyword searches—it knows queries, fetches correct results, and even sums up data to provide a superior user experience. Developers can integrate DeepSeek API into different apps to enhance searching accuracy, performance, and efficiency.
This tutorial will take you through all you need to learn about DeepSeek API—configuring access and calling the API, processing responses, and optimizing its use in actual applications. Whether you are a novice or an advanced developer, after going through this article, you will have a good idea of how to properly incorporate DeepSeek API in your projects.
Let’s begin!
What is DeepSeek API?
DeepSeek API is an application that assists applications in locating and interpreting information more intelligently. It is similar to a highly intelligent search engine that can retrieve the most suitable data depending on what you query.
For example, if you have a huge library with millions of books, and you want to retrieve information very quickly. Rather than physically going through books one by one, you have a very skilled librarian (DeepSeek API) who retrieves your exact information instantly.
DeepSeek API is widely used across AI-driven apps, chatbots, and information analysis to retrieve accurate answers, summarize data, and enhance search experiences. Programmers embed it into apps or websites to enhance searching as being quicker, more intelligent, and more efficient.
Steps to use DeepSeek API
Step 1: Get API Access and Authentication
To use the DeepSeek API, you first need to sign up, get an API key, and authenticate your requests. Think of the API key as a special passcode that lets you access DeepSeek’s features.
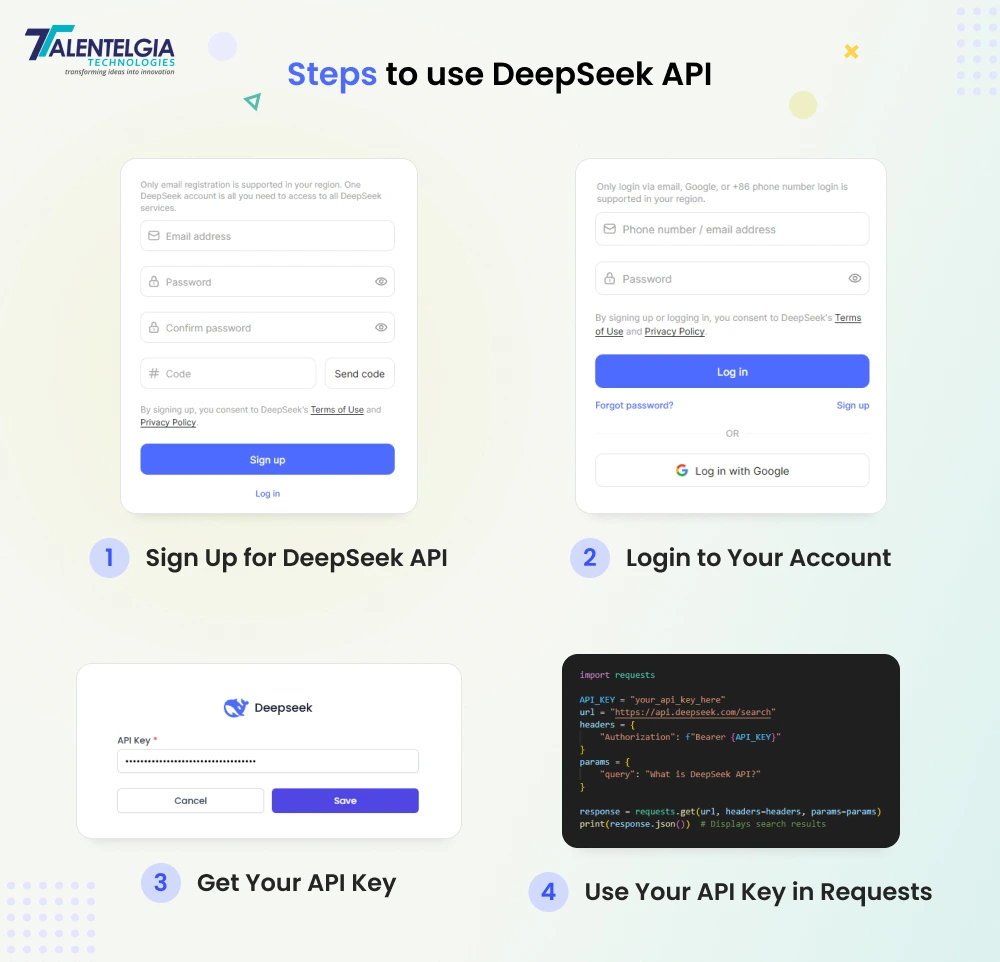
1.1 Sign Up for DeepSeek API
- Open your web browser and go to the DeepSeek API website (e.g., deepseek.com).
- Click on the Sign Up button.
- Enter your email, password, and other details to create an account.
- Verify your email by clicking on the confirmation link sent to your inbox.
1.2 Login to Your Account
- Once your account is verified, go back to the DeepSeek API website and click on Log In.
- Enter your email and password to access your account.
1.3 Get Your API Key
- After logging in, go to the Developer Dashboard or API Keys section.
- Click Generate API Key (or a similar button).
- A unique API key will appear. This is your access pass to use DeepSeek API.
Important: Keep your API key private (do not share it with anyone). Copy and save the key somewhere safe, as you’ll need it in your code.
1.4 Use Your API Key in Requests
Once you have your API key, you need to use it every time you make a request. Here’s a simple example in Python:
python
import requests

API_KEY = "your_api_key_here"
url = "https://api.deepseek.com/search"

headers = {
    "Authorization": f"Bearer {API_KEY}"
}

params = {
    "query": "What is DeepSeek API?"
}

response = requests.get(url, headers=headers, params=params)

print(response.json())  # Displays search results
By completing Step 1, you now have:
- A DeepSeek API account
- Your API key
- A way to authenticate your requests
Now, you’re ready to make your first API call!
Step 2: Install Required Tools
Once you have the API key, the next thing to do is install the tools on your computer that you will use to communicate with the DeepSeek API and get useful information.
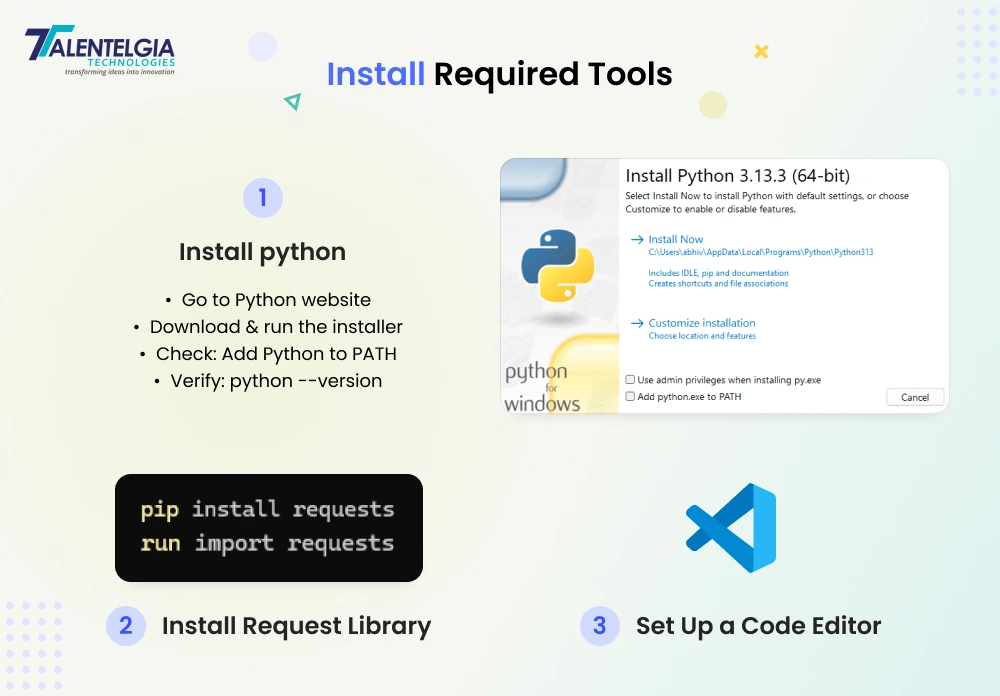
Install Python
Python is a widely used programming language that is used for interacting with APIs. If you do not have Python installed on your computer, follow these instructions to install it.
- Open your web browser and navigate to the official Python website.
- Download the current version of Python that is compatible with your operating system.
- Open the file that you downloaded and proceed with the installation process.
- While installing, select the check box to add Python to the system path.
- Once you are done installing, open a command prompt or terminal and run the command python –version to confirm that the installation is successful.
Install Requests Library
The requests library in Python makes it easy for you to send and receive data from APIs.
- Open a command prompt or terminal.
- If you are using a programming language like Python, install the required libraries. Type the command ‘ pip install requests ‘ and press enter.
- For JavaScript (Node.js), you might need:
bash::

npm install axios- Wait for the installation to finish.
- To verify if the library has been correctly installed, type ‘ python ‘ and then type ‘ import requests ’ in the Python shell. If no error shows, the installation was a success.
Set Up a Code Editor
A code editor assists you in writing and testing your API calls effectively.
- Download and install a code editor like Visual Studio Code or PyCharm.
- Open the editor and make a new Python file.
- Save the file with a .py extension, which is the extension for a Python script.
After these tools are installed, you can write code that interacts with the DeepSeek API.
Also Read: Best No-Code AI Tools
Step 3: Make Your First API Request
Now that the required tools are installed, the next thing to do is to make a request to the DeepSeek API. This involves coding a small snippet of code to test whether the API is functioning correctly.
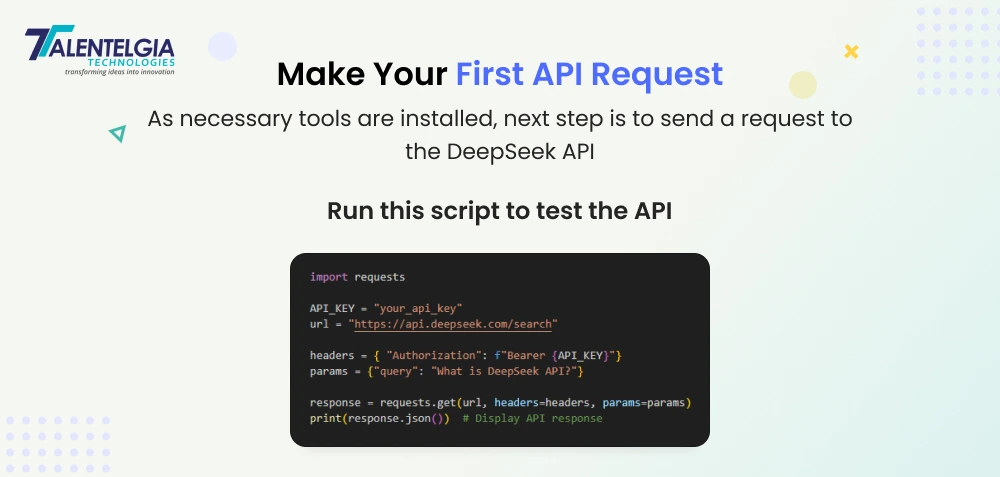
Understanding API Requests
An API request is a method of requesting the DeepSeek API for data. It’s the same as typing a query into a web search and getting an answer. The request should also have the API key, which serves as a password to authenticate access.
Writing Your First API Request
To request the DeepSeek API, do the following:
First, open your code editor and create a new Python file. Name it ‘ test_api.py ‘or any name of your choice.
In the file, type the following code:
import requests

API_KEY = "your_api_key"
url = "https://api.deepseek.com/search"
headers = {
    "Authorization": f"Bearer {API_KEY}"
}
params = {
    "query": "What is DeepSeek API?"
}
response = requests.get(url, headers=headers, params=params)
print(response.json())  # Display API response
First, let’s import the requests library so that Python knows how to interact with the API. Then, set the API endpoint or the web URL where the request is being made. Next, add your API key to validate your request. Finally, send the request and print out the response to see whether the API is functioning.
Running the Code
After the code is written, save the file and then open a terminal or command prompt. Move to the directory where the file has been saved. Execute the script by typing ‘ python test_api.py ‘ and then pressing enter. If you have everything properly set up, you should get a response from the API. This response may contain information like text, numbers, or that the request was successful.
These steps guarantee that the DeepSeek API is correctly functioning before proceeding with more intricate assignments.
Step 4: Process and Analyze API Response
Once the first API request has been successfully made, the subsequent step is to process the response obtained from the DeepSeek API.
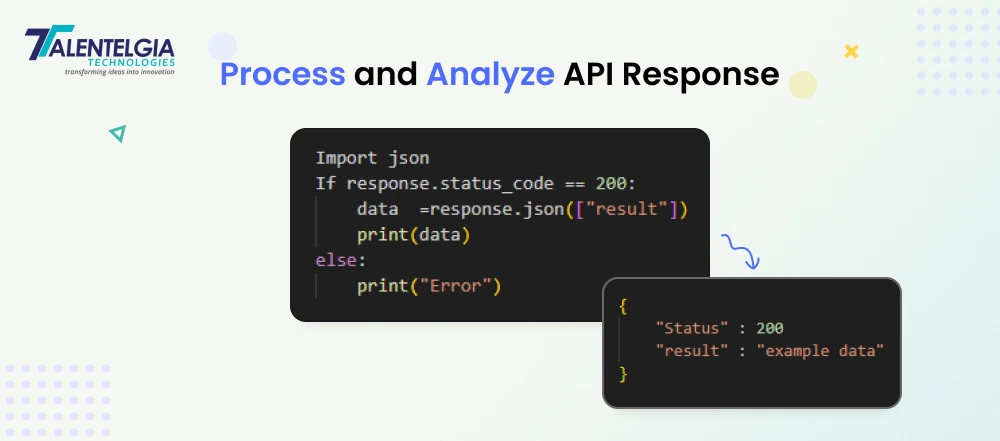
Understanding the API Response
As soon as a request is initiated, the API gives a response in an organized manner, mostly in JSON. JSON is short for JavaScript Object Notation and is widely used for data transfer as it is simple to read and process.
Example response :
json:

{    "results": [
        {
            "title": "DeepSeek API Guide",
            "url": "https://deepseek.com/docs",
            "snippet": "Learn how to use DeepSeek API for intelligent    search."
        }
    ]
}
Extracting Useful Information
The response consists of various bits of information, such as the status of the request, the requested information, and occasionally error messages in case something goes wrong. To make useful data extraction, the response must be parsed.
For instance, in Python, this can be done by using the json module. If the response contains a field named result, it can be extracted by response.json()[\”result\”]. This only displays the information that is required rather than the whole response.
Handling Errors
At other times, the API request can fail because of invalid inputs, network connectivity, or an expired API key. A check for the response status code should always be done. The status code should be 200 if the request was successful. A different number, for example, 400 or 500, could mean that there is a problem that needs to be corrected before going any further.
Step 5: Implement API in a Project
After understanding and processing the API response, the subsequent task is applying it in a practical project.
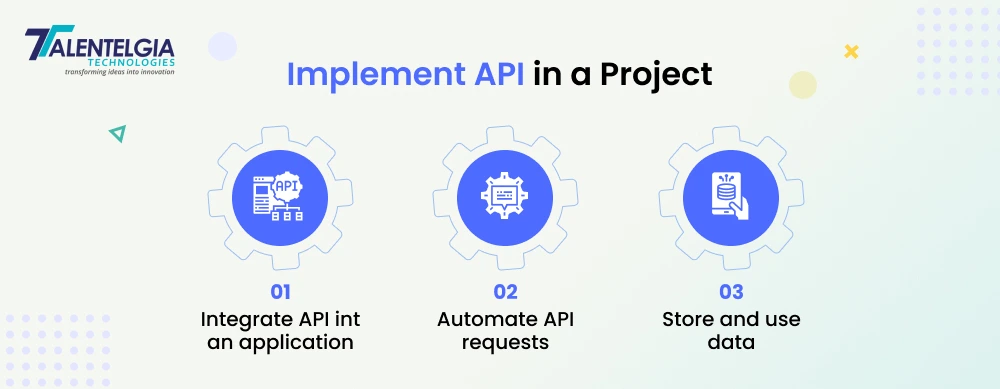
Using API in an Application
The DeepSeek API can be applied in various kinds of applications, like chatbots, data-analyzing software, or automation scripts. Based on the project, the API may be invoked several times in order to retrieve live data.
Automating API Requests
Rather than repeatedly running the API request manually, automation can be employed. This is achieved by running the request at regular time intervals or when a condition is triggered. This applies to applications that need frequent updates from the API.
Storing and Using the Data
After the API produces helpful information, it can be cached in a database or surfaced in an application interface. This process is based on the nature of the project that is being developed. For instance, if the API gives search results, the results are surfaced in a user-friendly manner, like a list or table.
By properly incorporating the API, applications may be more capable and give real-time data effectively.
Step 6: Handle Errors and API Rate Limits
Ensure your application handles errors gracefully:
- 429 Error: Too many requests – implement rate limiting.
- 401 Error: Invalid API key – check authentication.
- 500 Error: Server issue – retry the request after a few seconds.
Example of handling errors in Python:
python

if response.status_code == 200:
    print("Success:", response.json())
elif response.status_code == 401:
    print("Authentication Error: Check your API key")
elif response.status_code == 429:
    print("Rate Limit Exceeded: Slow down requests")
else:
    print("Error:", response.status_code)
Step 7: Optimize API Usage for Performance
- Cache frequent requests to reduce API calls.
- Use efficient queries to avoid unnecessary data retrieval.
- Monitor API usage to stay within the allowed rate limits.
By following these steps, you can integrate, optimize, and use DeepSeek API effectively in your applications.
Also Read: Email API Integration for Developers: Fast & Reliable
Conclusion
Throughout this guide, from setting up API access and sending your first request to processing responses, error handling, and optimizing API performance, we have covered it all in this guide. If you follow these steps, you can easily incorporate DeepSeek API into your projects with enhanced search accuracy and user experience.

As technology keeps evolving, the utilization of smart APIs such as DeepSeek will become a necessity for businesses and programmers who wish to remain at the forefront. If you now possess a firm background, it's time to venture out, play around, test new boundaries, and tap the full power of DeepSeek API in your project.
Frequently Asked Questions (FAQs)
How do I resolve a “Request Limit Exceeded” error?
This indicates that you have exceeded the permissible number of API requests for a specific duration. You may either wait out the reset period or increase your request limit by upgrading your plan.
What can I do if the DeepSeek API response is slow?
Slow response times can be due to high server load or network conditions. To rectify this, verify your internet connection, tweak your API calls (e.g., minimize the request size), or use a lower-latency server if present.
Why am I receiving incomplete or wrong data?
This may occur if your query parameters are not properly set. Check your API request format and confirm that you are applying the proper filters and parameters to obtain proper results.
How do I fix a “403 Forbidden” error?
A 403 error means you are not allowed to access the requested resource. Ensure your API key is valid, verify whether your account has the required level of access, and ensure your IP is not blocked by the API provider.
What do I do if my API request is timing out?
A timeout usually occurs due to network issues or slow API processing. To fix this, try increasing the timeout limit in your code, checking the API’s status page for downtime, or optimizing your request to fetch only necessary data.


 Write us on:
  Business queries:
  HR:
HR: 


